Example: Boxes with text and math

Published 2006-11-24 | Author: Kjell Magne Fauske

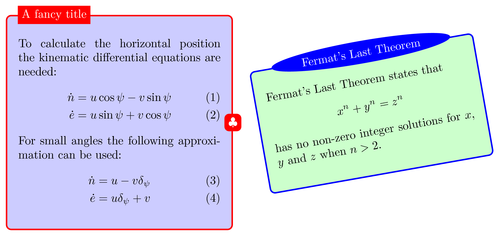
Colorful rounded boxes seems to be an important part of most poster presentations. Here are a few examples on how to create boxes with text and math using PGF/TikZ. The easiest solution is to put a minipage environment inside a node.
Download as: [PDF] [TEX]

Boxes with text and math

Do you have a question regarding this example, TikZ or LaTeX in general? Just ask in the LaTeX Forum.
Oder frag auf Deutsch auf TeXwelt.de. En français: TeXnique.fr.

\documentclass{article}

\usepackage{tikz}
\usetikzlibrary{shapes,snakes}
\usepackage{amsmath,amssymb}
\begin{document}


% Define box and box title style
\tikzstyle{mybox} = [draw=red, fill=blue!20, very thick,
    rectangle, rounded corners, inner sep=10pt, inner ysep=20pt]
\tikzstyle{fancytitle} =[fill=red, text=white]

\begin{tikzpicture}
\node [mybox] (box){%
    \begin{minipage}{0.50\textwidth}
        To calculate the horizontal position the kinematic differential
        equations are needed:
        \begin{align}
            \dot{n} &= u\cos\psi -v\sin\psi \\
            \dot{e} &= u\sin\psi + v\cos\psi
        \end{align}
        For small angles the following approximation can be used:
        \begin{align}
            \dot{n} &= u -v\delta_\psi \\
            \dot{e} &= u\delta_\psi + v
        \end{align}
    \end{minipage}
};
\node[fancytitle, right=10pt] at (box.north west) {A fancy title};
\node[fancytitle, rounded corners] at (box.east) {$\clubsuit$};
\end{tikzpicture}%
%
\tikzstyle{mybox} = [draw=blue, fill=green!20, very thick,
    rectangle, rounded corners, inner sep=10pt, inner ysep=20pt]
\tikzstyle{fancytitle} =[fill=blue, text=white, ellipse]
%
\begin{tikzpicture}[transform shape, rotate=10, baseline=-3.5cm]
\node [mybox] (box) {%
    \begin{minipage}[t!]{0.5\textwidth}
        Fermat's Last Theorem states that
        \[
            x^n + y^n = z^n
        \]
        has no non-zero integer solutions for $x$, $y$ and $z$ when $n > 2$.
    \end{minipage}
    };
\node[fancytitle] at (box.north) {Fermat's Last Theorem};
\end{tikzpicture}
%

\end{document}

Comments

  • #1 Wolfgang Gruber, January 29, 2009 at 7:22 p.m.

    Hello Kjell Magne,

    I tried to modify your example to produce old style computer paper for matrix printers and experienced the problem not being able to check for the end of the box. So I stripped down the code to the essential parts and included the explicit question as a comment. Please help.

    Wolfgang

    \documentclass{article}
    
    \usepackage{tikz}
    
    \usetikzlibrary{calc}
    
    \usepackage{ifthen}
    
    \begin{document}
    
    % Define box and box title style
    
    \tikzstyle{mybox} = [draw=red,very thick,
        rectangle, rounded corners, inner sep=10pt]
    
    \tikzstyle{fancytitle} =[fill=red, text=white]
    
    \begin{tikzpicture}
    
    \node [mybox] (box){%
    
        \begin{minipage}{0.50\textwidth}
            To calculate the horizontal position the kinematic differential
            equations are needed.
            For small angles the following approximation can be used.
    
            To calculate the horizontal position the kinematic differential
            equations are needed.
            For small angles the following approximation can be used.
        \end{minipage}
    
    };
    
    \newlength{\yCoord}
    
    \setlength{\yCoord}{0mm}
    
    \newlength{\ymaxCoord}
    
    \newlength{\rowHeight}
    
    %How to set \rowHeight to the lineadvance ?
    
    %How to set \ymaxCoord to the height of the minipage ?
    
    %Is there a way to get these values out of the minipage ?
    
    %And/Or is there a way to get these values from the (box.north west,box.south west)
    
    \setlength{\rowHeight}{5mm}
    
    \setlength{\ymaxCoord}{2cm}
    
    \whiledo{\lengthtest{\yCoord < \ymaxCoord}}
    
    {
    
    \addtolength{\yCoord}{\rowHeight}
    
    \draw  ($(box.north west)+(0,-\yCoord)$)--($(box.north east)+(0,-\yCoord)$);
    
    }
    
    \end{tikzpicture}%
    
        \end{document}
    
  • #2 Kjell Magne Fauske, January 30, 2009 at 12:37 p.m.

    How to set \rowHeight to the lineadvance ?

    Do you mean the line height? Not sure how to calculate this accurately. I'm not familiar enough with the way TeX breaks the text. If you know the height of the box you can probably find a decent estimate.

    How to set \ymaxCoord to the height of the minipage ?

    You can get this information from the node anchor coordinates like you suggested. Here is a macro I wrote a long time ago:

    \makeatletter
    \newdimen\tu@tmpa%
    \newdimen\ydiffl%
    
    % Compute the y difference between two coordinates
    % Result is stored in the \ydiffl register
    % Example
    %   \coordinate (a) at (0,1);
    %   \coordinate (b) at (0,3);
    %   \ydiff{a}{b}
    %   \node[minimum size=\ydiffl] {\the\ydiffl};
    \newcommand\ydiff[2]{%
        \coordinate (tmpnamea) at (#1);%
        \coordinate (tmpnameb) at (#2);%
        \pgfextracty{\tu@tmpa}{\pgfpointanchor{tmpnamea}{center}}%
        \pgfextracty{\ydiffl}{\pgfpointanchor{tmpnameb}{center}}%
        \advance\ydiffl by -\tu@tmpa%
    }
    \makeatother
    

    If you feed it the appropriate node coordinates it should compute the height of the box for you. Probably not the most elegant solution.

  • #3 Nick Papior Andersen, October 18, 2009 at 4:02 p.m.

    Hi all & Kjeld

    Amazing work... I tried puzzling a bit with it. And i have made some code which makes it easier to type the club suit and the title to the boxes. Check this code out. I really think it simplifies things a lot! And it brings many possibilities with it! :D

    \documentclass{minimal} 
    \usepackage{tikz}
    \usetikzlibrary{shapes,decorations}
    \usepackage{amsmath,amssymb}
    \begin{document}
    
    % We need to save the node
    % Every append after command might be useful to have this code
    \def\savelastnode{\pgfextra\edef\tmpA{\tikzlastnode}\endpgfextra}
    \def\restorelastnode{\pgfextra\edef\tikzlastnode{\tmpA}\endpgfextra}
    % Define box and box title style
    \tikzstyle{mybox} = [draw=red, fill=blue!20, very thick,
        rectangle, rounded corners, inner sep=10pt, inner ysep=20pt]
    \tikzstyle{fancytitle} =[fill=red, text=white]
    \tikzstyle{club suit} = [append after command={%
        \savelastnode node[fancytitle,rounded corners] at (\tikzlastnode.east)%
        {$\clubsuit$}\restorelastnode }]
    \tikzstyle{title} = [append after command={%
        \savelastnode node[fancytitle,right=10pt] at (\tikzlastnode.north west)%
        {#1}\restorelastnode}]
    
    \begin{tikzpicture}
    \node [mybox,club suit,title=Fancy title] (box){%
        \begin{minipage}{0.50\textwidth}
            To calculate the horizontal position the kinematic differential
            equations are needed:
            \begin{align}
                \dot{n} &= u\cos\psi -v\sin\psi \\
                \dot{e} &= u\sin\psi + v\cos\psi
            \end{align}
            For small angles the following approximation can be used:
            \begin{align}
                \dot{n} &= u -v\delta_\psi \\
                \dot{e} &= u\delta_\psi + v
            \end{align}
        \end{minipage}
    };
    % These are no longer needed! It is now situated in the (box) node command!
    %\node[fancytitle, right=10pt] at (box.north west) {A fancy title};
    %\node[fancytitle, rounded corners] at (box.east) {$\clubsuit$};
    \end{tikzpicture}%
    \end{document}
    

    Hope this eases the TikZ-ing! :D

    Kind regards Nick

  • #4 Kjell Magne Fauske, October 18, 2009 at 8:11 p.m.

    @Nick: Thanks for sharing. Your solution is much more clever and elegant than mine.

  • #5 Erik, February 23, 2010 at 9:17 p.m.

    wow, you guys are too good at this! Very clever! Nice solution for slides, etc.

  • #6 Erik, March 3, 2010 at 6:28 p.m.

    Furthermore, this is a good solution to box equations with numbers without having to install the empheq package. This provides an easier way to emphasize stuff in a report. And it makes for great slides ofcourse. Again, really like this minipage solution!

  • #7 Glasgow, October 27, 2010 at 12:59 p.m.

    This provides an easier way to emphasize stuff in a report. And it makes for great slides of course. Again, really like this minipage solution!

  • #8 Alexis, February 26, 2012 at 4:16 p.m.

    I made a package out of your example, thanks a lot for sharing !

    http://snouffy.free.fr/blog-en/index.php/post/2010/01/30/Nice-boxes-for-your-theorems-with-tikz

    Alexis.

  • #9 Stefan Kottwitz, February 26, 2012 at 7:50 p.m.

    Thanks Alexis, very useful! I just tested your package from your website. I just cannot write a comment there, perhaps a login is required.

  • #10 biminitop, June 22, 2013 at 4:03 p.m.

    Iformation from the node anchor coordinates like you suggested. Here is a macro I wrote a long time ago:

  • #11 Regragui, August 18, 2013 at 11:31 a.m.

    I met these beautiful boxes. I wanted to use for definitions and theorems with different copteurs in sections. Please help

Adding comments is currently not enabled.