


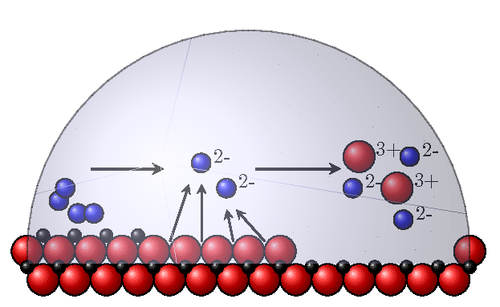
A "jazzy" picture of the stages of rust (presented for a high school level). Iron is red, oxygen is blue and electrons are black. At the left you see iron atoms with two oxygen molecules, then the electrons go to the oxygen molecules leaving oxygen ions and iron ions which then disolve.
Edit and compile if you like:
% Rusting Iron
% Author: Jason Waskiewicz
% A "jazzy" picture of the stages of rust (presented for a high school level).
% Iron is red, oxygen is blue and electrons are black. At the left you see
% iron atoms with two oxygen molecules, then the electrons go to the oxygen molecules
% leaving oxygen ions and iron ions which then disolve.
\documentclass{article}
\usepackage{tikz}
\usepackage[active,tightpage]{preview}
\PreviewEnvironment{tikzpicture}
\setlength\PreviewBorder{5pt}%


\begin{document}
    \begin{tikzpicture}[
        >=stealth,
        iron/.style={shade, ball color=red},
        electron/.style={shade, ball color=black},
        oxygen/.style={shade, ball color=blue},
        droplet/.style={ball color=blue!20, opacity=0.4},
    ]

    %Draw the iron atoms
    \foreach \x in {1,1.5,2,2.5,3,3.5,4,4.5,5,8}
            \draw [iron] (\x,1,-0.5) circle (0.25cm);
    \foreach \x in {1.25,1.75,2.25,2.75,3.25,3.75,4.25,4.75,5.25,5.75,6.25,6.75,7.25,7.75}
            \draw [iron] (\x,0.55,-0.5) circle (0.25cm);

    %Draw the iron electrons; this isn't totally realistic for illustrating Fe+3 ions
    \foreach \x in {1.25,1.75,2.25,2.75}
            \draw [electron] (\x,1.25,-0.5) circle (0.1cm);
    \foreach \x in {1,1.5,2,2.5,3,3.5,4,4.5,5,5.5,6,6.5,7,7.5,8}
            \draw [electron] (\x,0.75,-0.5) circle (0.1cm);

    %Draw the O2 molecules
    \draw [oxygen] (1.5,1.8,-0.5) circle (0.15cm);
    \draw [oxygen] (1.6,2.0,-0.5) circle (0.15cm);

    \draw [oxygen] (1.8,1.6,-0.5) circle (0.15cm);
    \draw [oxygen] (2.05,1.6,-0.5) circle (0.15cm);

    %Draw the arrows showing the electrons going to the O2 molecules
    \draw (3.45,1.35) -- (3.75,2.25) [->,thick];
    \draw (3.95,1.35) -- (3.95,2.25) [->,thick];
    \draw (4.45,1.35) -- (4.35,1.85) [->,thick];
    \draw (4.95,1.35) -- (4.5,1.85) [->,thick];

    %Draw O-2 ions with (-) labels
    \shadedraw [oxygen] (3.75,2.4,-0.5) circle (0.15cm) node [above=3pt,right=2pt] {\small{2-}};
    \shadedraw [oxygen] (4.15,2.0,-0.5) circle (0.15cm) node [above=3pt,right=2pt] {\small{2-}};

    %Draw the dissolved Fe+3 ions and O-2 ions
    \shadedraw [iron] (6.25,2.5,-0.5) circle (0.25cm) node [above=3pt,right=4pt] {\small{3+}};
    \shadedraw [iron] (6.85,2.0,-0.5) circle (0.25cm) node [above=3pt,right=4pt] {\small{3+}};

    \shadedraw [oxygen] (6.95,1.5,-0.5) circle (0.15cm) node [above=3pt,right=2pt] {\small{2-}};
    \shadedraw [oxygen] (6.15,2.0,-0.5) circle (0.15cm) node [above=3pt,right=2pt] {\small{2-}};
    \shadedraw [oxygen] (7.05,2.5,-0.5) circle (0.15cm) node [above=3pt,right=2pt] {\small{2-}};

    %Draw the time arrows
    \draw (2.2,2.5) -- (3.35,2.5) [->,very thick];
    \draw (4.8,2.5) -- (6.15,2.5) [->,very thick];

    %Draw the water droplet
    \begin{scope}
            \clip (1,1) rectangle (8.5,5);
            \draw[droplet] (4.5,1,-0.5) circle (3.5cm);
    \end{scope}
    \end{tikzpicture}
\end{document}
Click to download: rusting-iron.tex • rusting-iron.pdf
Open in Overleaf: rusting-iron.tex