")


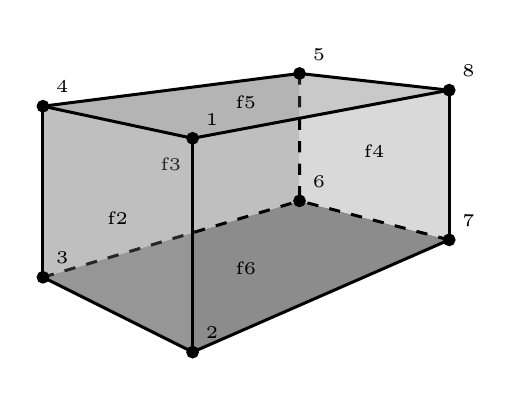
This code draws a cuboid using a 2 vanishing points perspective. Within the code, parameters can be revised to tune the drawing.
Edit and compile if you like:
% Under Creative Commons Attribution licence 3.0
% (http://creativecommons.org/licences/by/3.0)
% Author: Florian Lesaint
\documentclass[landscape]{article}
\usepackage{tikz}
\usepackage[active,tightpage]{preview}
\PreviewEnvironment{tikzpicture}
\setlength\PreviewBorder{10pt}%
\usetikzlibrary{calc}
\begin{document}
\begin{tikzpicture}
	%%% Edit the following coordinate to change the shape of your
	%%% cuboid

	%% Vanishing points for perspective handling
	\coordinate (P1) at (-7cm,1.5cm); % left vanishing point (To pick)
	\coordinate (P2) at (8cm,1.5cm); % right vanishing point (To pick)

	%% (A1) and (A2) defines the 2 central points of the cuboid
	\coordinate (A1) at (0em,0cm); % central top point (To pick)
	\coordinate (A2) at (0em,-2cm); % central bottom point (To pick)

	%% (A3) to (A8) are computed given a unique parameter (or 2) .8
	% You can vary .8 from 0 to 1 to change perspective on left side
	\coordinate (A3) at ($(P1)!.8!(A2)$); % To pick for perspective
	\coordinate (A4) at ($(P1)!.8!(A1)$);

	% You can vary .8 from 0 to 1 to change perspective on right side
	\coordinate (A7) at ($(P2)!.7!(A2)$);
	\coordinate (A8) at ($(P2)!.7!(A1)$);

	%% Automatically compute the last 2 points with intersections
	\coordinate (A5) at
	  (intersection cs: first line={(A8) -- (P1)},
			    second line={(A4) -- (P2)});
	\coordinate (A6) at
	  (intersection cs: first line={(A7) -- (P1)},
			    second line={(A3) -- (P2)});

	%%% Depending of what you want to display, you can comment/edit
	%%% the following lines

	%% Possibly draw back faces

	\fill[gray!90] (A2) -- (A3) -- (A6) -- (A7) -- cycle; % face 6
	\node at (barycentric cs:A2=1,A3=1,A6=1,A7=1) {\tiny f6};

	\fill[gray!50] (A3) -- (A4) -- (A5) -- (A6) -- cycle; % face 3
	\node at (barycentric cs:A3=1,A4=1,A5=1,A6=1) {\tiny f3};

	\fill[gray!30] (A5) -- (A6) -- (A7) -- (A8) -- cycle; % face 4
	\node at (barycentric cs:A5=1,A6=1,A7=1,A8=1) {\tiny f4};

	\draw[thick,dashed] (A5) -- (A6);
	\draw[thick,dashed] (A3) -- (A6);
	\draw[thick,dashed] (A7) -- (A6);

	%% Possibly draw front faces

	% \fill[orange] (A1) -- (A8) -- (A7) -- (A2) -- cycle; % face 1
	% \node at (barycentric cs:A1=1,A8=1,A7=1,A2=1) {\tiny f1};
	\fill[gray!50,opacity=0.2] (A1) -- (A2) -- (A3) -- (A4) -- cycle; % f2
	\node at (barycentric cs:A1=1,A2=1,A3=1,A4=1) {\tiny f2};
	\fill[gray!90,opacity=0.2] (A1) -- (A4) -- (A5) -- (A8) -- cycle; % f5
	\node at (barycentric cs:A1=1,A4=1,A5=1,A8=1) {\tiny f5};

	%% Possibly draw front lines
	\draw[thick] (A1) -- (A2);
	\draw[thick] (A3) -- (A4);
	\draw[thick] (A7) -- (A8);
	\draw[thick] (A1) -- (A4);
	\draw[thick] (A1) -- (A8);
	\draw[thick] (A2) -- (A3);
	\draw[thick] (A2) -- (A7);
	\draw[thick] (A4) -- (A5);
	\draw[thick] (A8) -- (A5);

	% Possibly draw points
	% (it can help you understand the cuboid structure)
	\foreach \i in {1,2,...,8}
	{
	  \draw[fill=black] (A\i) circle (0.15em)
	    node[above right] {\tiny \i};
	}
	% \draw[fill=black] (P1) circle (0.1em) node[below] {\tiny p1};
	% \draw[fill=black] (P2) circle (0.1em) node[below] {\tiny p2};
\end{tikzpicture}
\end{document}
Click to download: cuboid.tex • cuboid.pdf
Open in Overleaf: cuboid.tex