")


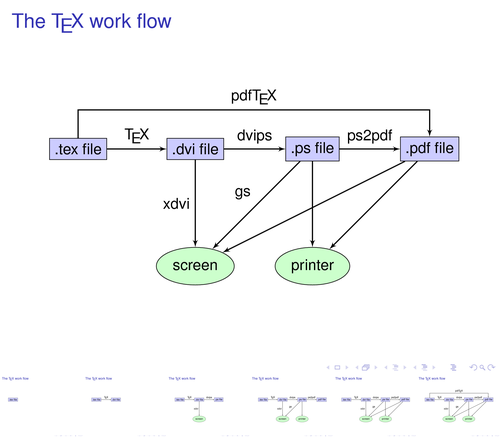
I spotted this well-known diagram of the TeX work flow in [1], where it was used to illustrate when a step-by-step presentation technique is appropriate. With Beamer and TikZ it is quite easy to gradually draw a diagram, since the \path construct is overlay aware. Download the PDF to see it in action.
| [1] | Veytsmann, B. (2006). Design of Presentations: Notes on Principles and LaTeX Implementation. The PracTeX Journal, 4 |
Edit and compile if you like:
\documentclass{beamer}

\usepackage[latin1]{inputenc}
\usepackage{times}
\usepackage{tikz}

\usetikzlibrary{arrows,shapes}


\begin{document}

\begin{frame}
\frametitle{The \TeX\ work flow}


\tikzstyle{format} = [draw, thin, fill=blue!20]
\tikzstyle{medium} = [ellipse, draw, thin, fill=green!20, minimum height=2.5em]

\begin{figure}
\begin{tikzpicture}[node distance=3cm, auto,>=latex', thick]
    % We need to set at bounding box first. Otherwise the diagram
    % will change position for each frame.
    \path[use as bounding box] (-1,0) rectangle (10,-2);
    \path[->]<1-> node[format] (tex) {.tex file};
    \path[->]<2-> node[format, right of=tex] (dvi) {.dvi file}
                  (tex) edge node {\TeX} (dvi);
    \path[->]<3-> node[format, right of=dvi] (ps) {.ps file}
                  node[medium, below of=dvi] (screen) {screen}
                  (dvi) edge node {dvips} (ps)
                        edge node[swap] {xdvi} (screen);
    \path[->]<4-> node[format, right of=ps] (pdf) {.pdf file}
                  node[medium, below of=ps] (print) {printer}
                  (ps) edge node {ps2pdf} (pdf)
                       edge node[swap] {gs} (screen)
                       edge (print);
    \path[->]<5-> (pdf) edge (screen)
                        edge (print);
    \path[->, draw]<6-> (tex) -- +(0,1) -| node[near start] {pdf\TeX} (pdf);
\end{tikzpicture}
\end{figure}
\end{frame}
\end{document}
Click to download: tex-workflow.tex • tex-workflow.pdf
Open in Overleaf: tex-workflow.tex